Hi, I am Regina
Partain, Owner and Innkeeper of Bridgeport
Lake Bed and Breakfast on
Lake Bridgeport, Texas.
My passions abound and include wedding planning, sewing, crafting,
quilting, jewelry making, and family, not necessarily in that order. The order changes
frequently, I think, based on my current project, or more accurately, current
projects.
To me they just say ‘let’s have fun’. There is just something very playful about
them. So, today we are going to make
some jewelry with, of all things, marbles!
Let’s get started.
What you will need:
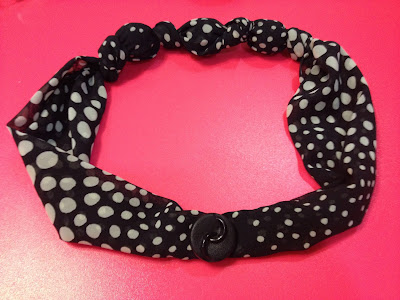
One narrow, long scarf that you no longer wear. The narrower your scarf is, the better it
will be as you begin to tie knots.
For this scarf I used 3 large marbles (approximately 1”
across), but for the pink one shown above (which was a longer and narrower
scarf, I used 1 large marble and 8 regular marbles). So, you will have to make the decision on
size and quantity of marbles based upon your scarf. Depending upon the length of your scarf, you
may need a button, needle and thread.
The scarf needs to be wide enough to wrap around the marble without the
color showing through.
That’s it. That is
all you need. Try to stick with marbles
close in color to the scarf so that the color of the marbles doesn’t show
through. The picture shows 9 marbles, but I replaced
the 8 smaller ones with 2 more large ones.
Find the center of your scarf by folding it in half
lengthwise and marking the fold. Then
fold the long edges in to the center.
Continue folding to the center until your scarf is approximately 5”
wide. A little more or less won’t
hurt.
Place your large marble at the center of the scarf. Now, this is the hardest part. Wrap the scarf around the marble while still keeping it relatively in the center of the scarf. Wrap it tightly. Placing a straight pin on one side of the marble, while you work on the other side, helps keep it centered.
Twist the scarf into a slender piece that you can tie a knot
in. Tie the knot and pull it as tightly
as you can, getting it as close to the marble as possible. Now, remove the pin on the other side, and
tie a knot there as well. Here is what it looks like with the first 2
knots. It is kind of hard to see in this
picture but look closely and you can see the marble in the middle with a knot
on either side.
Now, begin adding marbles to both sides. Slide the marble into the opening next to the
knot you have tied. Twist the scarf
tightly around the marble and then tie a knot.
Add 1 marble to one side and tie the knot, then move to the other side
and do the same thing. Work your way up
through the 8 regular marbles, 4 to each side.
Well, the scarf I used this time was not nearly as long as
the pink one in the other pictures, so I had to ‘punt’. I only used 3 marbles, and then I gathered
the ends of the scarf together and sewed a button on to anchor it and close the
opening, after first making sure it would fit over my head.
On the original pink necklace I simply tied a bow in the
ends of the ribbon after first deciding if I wanted the bow in the back or on
the side.
I would love to see what you make
with a scarf and marbles. Have fun!


Stephanie, thanks so much for having me as your guest blogger. I am so happy to be your first! This was fun to do. I hope your readers like it.
ReplyDeleteYou're welcome and thank you for such a nice tutorial and great photos!
DeleteThis is beautiful! I've never seen one of these before but now that I have I'm willing to try it myself. Thanks for sharing. :)
ReplyDeleteThis was new to me too. They sure are elegant and pretty!
DeleteSo cute! Pinning it to try out!
ReplyDeleteThis is so clever I would have never thought to do something like this. Pinning!
ReplyDeleteMe either!
DeleteI am in love! So simple and elegant!!
ReplyDeleteShe did a great job! I love it too!
Delete